- Photo editing
- Feb 22, 2023
How to Blur Image Backgrounds Like a Pro
Blurring image backgrounds is one of the most powerful photography techniques you can learn. It’s a great way to make your photos look more professional and draw attention to your subject. The effect is so popular that even smartphone cameras now have portrait modes that use blurring to create interesting shots.
But if you want truly stunning results, understanding how to blur an image background with manual tools is key. Most designers and editors recommend investing in a DSLR camera and learning how to use Adobe Photoshop for the best result.
However, this doesn’t have to be expensive! You can create beautiful, blurred backgrounds with any camera, even a smartphone.
In this guide, we’ll show you everything you need to know in order to master the art of blurring backgrounds like a pro.
Why Would I Blur the Background?
When you blur the background of a photograph, it has the effect of making your subject stand out. Depending on how strong the blur is, it can be used to make effects that range from subtle to very noticeable.
Blurring can also be used to add atmosphere and emotion to photos. For example, if you want to emphasize sadness or loneliness in a portrait, you could use blurring with a shallow depth of field to draw attention away from the rest of the scene. You could also use motion blur to give a sports photo a lively feel when someone is playing.
In terms of composition, blurring can help keep people’s eyes on your subject, which is the most important part of your photo. It can also help you create a sense of depth by drawing the eye into different areas of your photo.
Finally, blurring is an excellent tool for masking distractions. If there’s something in your background that takes away from the subject or composition, then you can use blur to push it further back and make it less noticeable.
What Influences the Background Blur?
There are several factors that influence how much blur you get in the background of a photo.
The first and most important is your camera’s aperture setting, which determines the size of the area that will be in focus. The lower your aperture value (f-stop), the more blurred your background will be, and the shallower your depth of field will be.
The focal length of the lens is also important. Longer lenses tend to have stronger blurring effects than shorter lenses because they can separate subjects from backgrounds better.
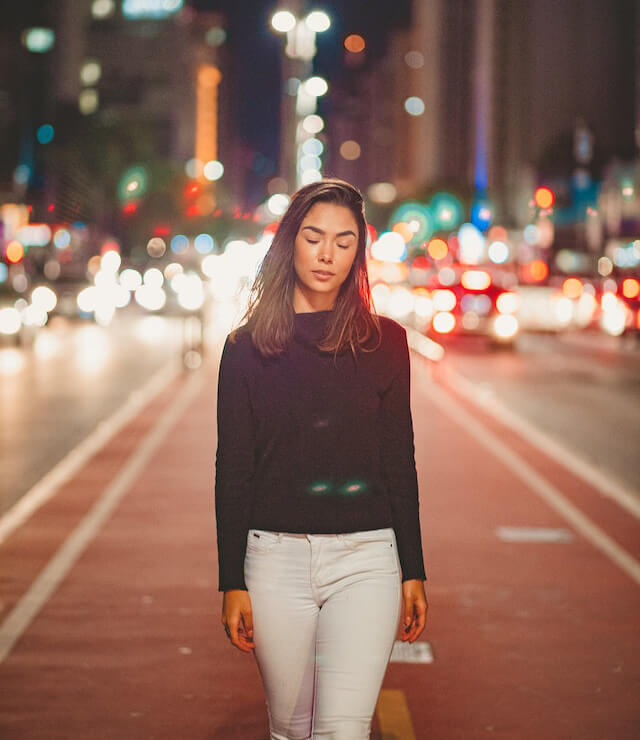
Finally, the distance between the subject and background makes a difference. The further away your background is from the subject, the more blurry it will appear in comparison. Suppose you’re photographing a person standing in front of an urban skyline. The background will be much more blurred if your subject is close to the camera and the skyline is far away, compared to if they are both standing at the same distance from the camera.
Can You Blur the Background of a Photo Already Taken?
Yes, you can blur the background of an existing photo with digital tools.
Most of the time, you have to find the area you want to blur and then use a filter or blurring tool to get the effect you want. The amount of blur you can get will depend on the quality and resolution of your original photo, but most programs have enough features to create believable results.
The best tool for this job is Slazzer!
An Introduction to Slazzer

Slazzer is an AI-powered tool that uses cutting-edge computer vision algorithms to remove the background of any online image quickly and accurately, replacing it in seconds with the highest quality results.
With Slazzer, you can easily blur the background of an existing photo with just a few clicks. Simply upload your photo, select the area you would like to blur, and choose one of its advanced blurring settings. And once you’re done, you can easily save or share your results.
Slazzer also allows users to customize their results further by fine-tuning settings such as intensity and brush size. This makes it easy to get the exact look and feel that you want for any image.
How to Blur the Background of a Photo with Slazzer?
Blurring the background of an image with Slazzer is surprisingly simple. Just follow these steps:
- First, you need to select a photo to blur.
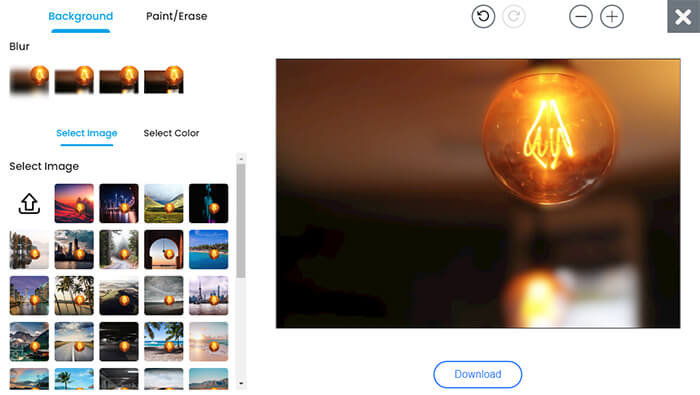
- Next, open slazzer.com/upload, click on Upload Image, and choose the selected photo from the library, or you can simply drag and drop the image or just copy-paste the image.
- Once the photo is uploaded, Slazzer will automatically blur the image. In fact, it will remove the background in its entirety.
- Now that the complete background is removed, go to the Edit option and choose Edit Preview. In this section, you will find multiple blur options with different intensities. Select an option that matches your needs. Moreover, if you want to add a separate background to the photo, you can do that as well since there are plenty of background options available.
- Once you have your chosen settings, click on the Download button, and your edited image will be saved to your device.
Bokeh and Blur Quality
When it comes to creating a beautiful, blurred background for your image, the quality of the bokeh (the aesthetic quality of the blur) is just as important as the amount of blur itself. Fortunately, modern cameras and lenses produce excellent bokeh due to advanced glass design and engineering.
On inexpensive cameras, areas that aren’t in focus may look a little harsh or busy. This can be fixed by buying more expensive lenses with better optics or by using post-processing tools like selective blurring or noise reduction.
You should also take into account any atmospheric conditions when taking pictures, such as windy weather, which can cause “bokeh shake,” resulting in less-than-ideal blur quality. Similarly, the presence of large objects nearby will also affect the quality and intensity of your background blur.
Ultimately, creating a beautifully blurred background is all about trial and error. You should experiment with different settings to determine what type of effect you’re going for, as well as understand how your camera works so that you can make informed decisions when it comes to achieving your desired aesthetic.
Slazzer’s advanced blurring tool allows users to customize their image’s blur quality by adjusting various settings, such as brush size and strength, according to their needs. By experimenting with these settings, you can create stunningly professional images with effortless ease.
How to Take Photos with Blurred Background With Your Phone– Step by Step
Nowadays, the majority of smartphones come with a portrait mode that allows you to blur the background of your images. In particular, portrait mode uses depth-sensing technology to separate a subject from its background so that each can be blurred separately. When using portrait mode on your phone’s camera, you should pay attention to these steps:
- First, find a well-lit scene and make sure there are no distracting elements in the frame. You may want to use a tripod or other stabilizing device if your phone doesn’t have image stabilization built-in.
- Next, tap the portrait icon (sometimes this is represented by an “M” for “Mode”). If your phone has multiple lenses, make sure the one you choose is the one used for portraits.
- Now, focus on your main subject. Make sure the lights are evenly balanced and that the subject stands out against the background.
- Once you’ve composed your shot, press the shutter button and take a few pictures to make sure you get it right.
- Finally, review your images and make any adjustments if necessary. You can also adjust depth-of-field after taking the photo by tapping on Edit Depth in your camera app. This will allow you to change the level of blur on a specific part of your image or to completely remove it from certain areas.
Blurring the Background of an Image in Lightroom
In addition to using your phone’s portrait mode, you can also blur the background of an image by using Lightroom or Adobe Photoshop. When blurring in either of these two programs, pay attention to these steps:
- First, open your image in either Lightroom or Photoshop and make sure it is properly cropped for the desired effect.
- Next, click on the Adjustment Brush tool and increase its brush size to cover the entire portion of the image that needs to be blurred. You may want to decrease the opacity slightly to create a softer blur effect.
- Creating a Mask layer will allow you to make further adjustments or selectively blur certain areas of the image.
- Now, set the brush’s rate depending on how much blur you want—the higher the rate, the more blur you’ll get. You can also adjust the feathering, which determines how hard or soft the edges of the blur are.
- Finally, click on the “Apply” button to apply your settings.
Factors to Keep in Mind When Blurring Image Backgrounds
When blurring the background of an image, you need to think about things like the focal length of your lens and how far away you are from your subject. Generally speaking, the longer the focal length of your lens is, the more background blur you’ll get. Similarly, if you increase the distance between you and your subject, the blur will be softer; conversely, if you decrease this distance, you’ll get a stronger blur effect.
It’s also important to consider environmental factors when taking pictures, such as windy weather, which can cause “bokeh shake,” resulting in less-than-ideal blur quality. Similarly, the presence of large objects in the background (such as trees) will also interfere with your desired blur effect.
Lastly, when taking photos, it’s important to pay attention to how much light there is. If you want to achieve a strong blur effect, try to shoot in bright sunlight; otherwise, you may need to increase your ISO or shutter speed if shooting in dimly lit environments.
How to Utilize Blur Background Effects for Endless Possibilities
Once you’ve mastered the basics of blurring image backgrounds, you can start experimenting with more advanced techniques. For example, creating an effect called “bokeh balls” is a great way to make your images look more dynamic and interesting. This technique involves shooting at night or in low light and focusing on a background light source (such as street lights, car headlights, etc.) while taking the photo. The result is an image with round bokeh balls that create an abstract effect.
In addition to bokeh balls, you can also use blur effects to add motion and depth to your photos. By increasing the shutter speed while panning your camera across a scene, you can create dynamic blurred lines that can make your images look like they are in motion.
Finally, if you’re feeling creative, why not try creating a “tilt-shift effect”? This technique involves blurring the background while keeping the foreground in focus, thereby giving the illusion of a miniature world. To create this effect, you will need to use special lenses and camera settings, such as a wide-angle lens and high f-stop numbers (16 or higher).
With these tips in mind, you can now blur image backgrounds like a pro! So go ahead and give it a try—you may just surprise yourself with what you can create!
The Bottom Line
Blurring backgrounds is a great way to draw attention to the subject of an image and create interesting effects. While it’s easy to achieve in photo editing programs, factors such as light and lens focal length should be taken into account before shooting. With practice, you can master techniques like bokeh balls and tilt-shift for stunning images with motion or depth. So don’t be afraid to get creative—have fun exploring different blur effects and finding out what unique style works best for you! Who knows? You might just become the next pro photographer!

Comments (0)