- Tips & Tricks
- Mar 10, 2022
How to Remove the Background from a Picture in PowerPoint
When done right, a PowerPoint presentation can be a powerful tool to demonstrate your ideas. While words and graphs are important, the presence of useful photos cannot be understated. Despite this, it is important to ensure that the pictures you use are not distracting so that your viewers can focus on what you wish to show.
At times, backgrounds do not serve any purpose and take away from your point. When this happens, the best course of action is to simply remove them.
This should not be a problem if you lack the necessary design skill or lack access to photo editing programs like Adobe PhotoShop or CorelDRAW. Fortunately, it is possible to remove the background from most photos in Microsoft PowerPoint . You can use the program to cut it out and then copy paste the result in documents!
Continue reading this article to know how to remove the background from a picture in PowerPoint.
What is Microsoft PowerPoint?
These days, slideshow presentations have become a staple in meetings as they help emphasize key points in the slides to both the presenter and the audience. As such, Microsoft PowerPoint has become an important tool for the main purpose of making such slideshows.
Microsoft PowerPoint was created by Dennis Austin and Robert Gaskins at Forethought, Inc. and was released in 1987. The software was acquired by software giant Microsoft three months after the release for $14 million. Two years later, it became an official part of the Microsoft Office suite. It has come a long way since then. As a matter of fact, it now makes up approximately 95 percent of the presentation software market share across the globe.
PowerPoint is a versatile platform that allows users to perform many different functions. The program started out as a way to show visual aids on a screen, so it makes sense that it offers various photo editing tools.
Among other things, it seems like not many people are aware that they can use it to edit photos. Keep reading to learn how you can do this to save some time while making a presentation that will surely impress.
Why You Should Remove the Background in Your Photos
When making a presentation, you have to maximize the space in every single slide. This means that you must be mindful about the various visual elements since you need to capture the attention of your audience.
A cluttered slideshow can be destructive and cause your audience’ eyes and minds to wander. While backgrounds can serve as decorative elements, they tend to eat up a lot of space without much else to add. However, getting rid of the background altogether helps to enhance the overall cohesiveness of the slide and makes it more impactful.
Cropping might help with this to a certain extent. By minimizing how much of the photo we can see, you can narrow down the focus of the image. However, besides cropping, there is also a built-in function for this within PowerPoint.
What Tools You Can Use to Remove the Background
There are two built-in tools in Microsoft PowerPoint at your disposal that you can use to remove the background of a picture. Once you know how to use the pair of tools, you should be able to easily edit out the background from most photos.
Here are the two tools that are especially useful for this task:
1. The Set Transparent Color tool
The Set Transparent Color tool comes in handy when you want to get rid of solid backgrounds without breaking a sweat. It works best for photos with white backgrounds as is the case with many stock photos.
2. The Remove Background tool
If your image has a solid background, then the Remove Background tool can be useful. However, the caveat is that it only works on images with a solid background. For more complicated images, however, it can be quite difficult and can even result in poor results.
However, you must first become familiar with these tools if you want to learn how to remove the background from a picture in PowerPoint. Please take note that these background removal tools will not work on vector graphic files. This means that you cannot use them to edit DRWs, svgs, and wms. If you are working on these files, you must first convert them to either PNG or JPEG before you can remove the background.
How to Remove a Solid Background
It is actually an easy process if you only have to remove a solid background from the photo. The Set Transparent Color tool is ideal in this situation. Here are the steps you need to follow if you want to edit out a white background with the help of PowerPoint:
- Insert a photo to the slide by copy-pasting it or using the insert tool.
- Select the photo you want to edit.
- Click the “Picture Tools Format Tab.”
- Select the “Color” button to open a drop-down menu.
- Choose the “Set Transparent Color” tool near the bottom of the menu.
- Click the color you would like to remove from the background.
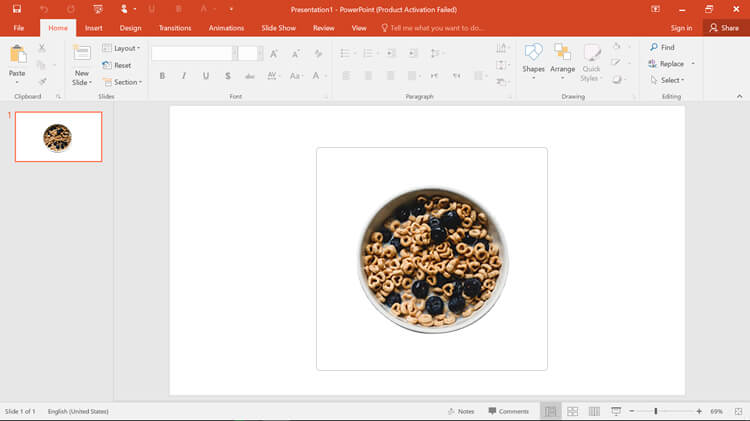
Here’s what the image looked like before its background was removed:
Meanwhile, here’s the image with its background removed:

Once you accomplish the last step, PowerPoint will turn the solid color transparent. Yes, that is all it takes to remove a solid background! You are now a step closer to learning how to remove the background from a picture in PowerPoint if the background is complicated.
The Limitations of the Remove Background Tool
But what should you do if you are not working with a simple photo with a solid background? In this case, you must rely on the Remove Background Tool. While it can be a very useful feature, there are still certain limitations to this method that you need to keep in mind.
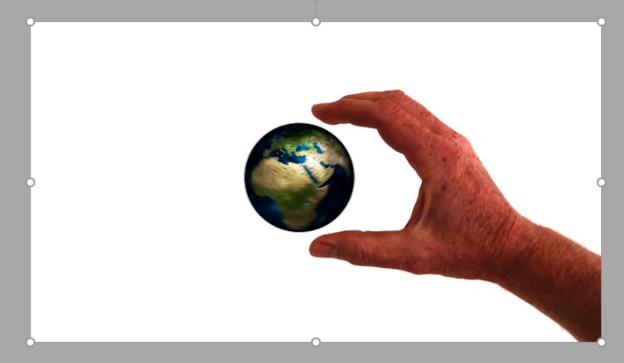
For one thing, it will not work very well if the background and the image you want to keep have similar colors. The Remove Background Tool cannot separate two images with similar colors since it relies on color to distinguish between the background and the image.
Not only that, but the tool can’t handle gradients well. The Set Transparent Color tool can only remove one color. A gradient has different hues and tones, so it will be unable to cover everything. Another limitation is that the technique can’t catch small details such as clothing or hair. The spaces between the hands will often have pixels left over as well.
As you can see, PowerPoint is not the most intuitive program out there. In any case, it can typically do the trick in a pinch and deliver simple edits to images. You can also manually edit out what the Remove Background Tool failed to cover with a few easy steps.
How to Mark Areas to Remove
Follow these steps if you want to correct the guess made by PowerPoint by marking the areas you want to remove:
- Click “Mark Areas to Remove.”
- Draw over the sections of the photo that you wish to get rid of using a red marker.
- Click the “Keep Changes” button once you are done.
By the end of this process, PowerPoint is going to readjust the coverage of the Background Removal tool. It might take a couple of tries before you get it right, however. This has to do with the complexity of the image in question.
How to Mark Areas to Keep
On the other hand, you can also specify the parts of the photo that you want to keep. The process is quite similar. Here are the steps you must follow:
- Click “Mark Areas to Keep.”
- Draw over the sections of the photo that you wish to keep using a green marker.
- Click the “Keep Changes” button once you are done.
Again, this allows you to finetune the Background Removal tool of PowerPoint. Depending on how complex the image is, you might have to try this several times until you are satisfied.
Meanwhile, if you prefer a much more straightforward approach than the aforementioned methods, then Slazzer is your best bet. With the help of this tool, you can easily remove background from a picture automatically by simply uploading your image, then clicking the Download button afterward.

If You Want to Undo the Background Removal Process
Now that you know how to remove the background from a picture in PowerPoint, you probably want to know how to undo the removal process. The background removal process only hides the removed portions of the photo. For this reason, it is always possible to restore the image to its original state. This is helpful if you ever change your mind and want the picture to remain as is.
How to Undo Background Removal
Here are the steps to undo the background removal process and start over:
- Select the photo whose background you had previously removed.
- Go to the Picture Tools Format Tab.
- Choose “Remove Background.”
- Adjust the settings. Alternatively, just click “Discard All Changes.”
With the last step, your image should now be restored to how it originally was. The background will go back to its initial state, and all the edits you have previously made should be discarded. There is one exception to this rule, however.
The only time that you will be unable to restore the image to the original state is once it has been compressed. Keep this in mind before you compress a photo. At the very least, you should also have a back-up copy of the original photo.
End Notes
At this point, we hope that you have learned how to remove the background from a picture in PowerPoint. Presentations should always be clear, cohesive, and focused. By removing unnecessary or distracting backgrounds, you can ensure that your viewers can give you their complete attention. Hopefully, you have also learned that you do not need advanced design skills or photo editing programs to accomplish this task.
PowerPoint made sure to offer users certain tools to make this seemingly daunting task much easier. The Set Transparent Color tool offers a quick way to get rid of image backgrounds, but it only works well when you have a solid color background. If you want an even more comprehensive tool, then the best recommendation we have is Slazzer.
Apart from removing a background from any image, it also allows you to upload the edited picture directly onto PowerPoint, making it quite convenient when you are making your presentation.


Comments (0)