- Tips & Tricks
- Jan 13, 2022
Image Optimization for SEO
Do you ever wonder what kind of images you should use and in what way so that your website gets maximum traction? It might sound like an easy task to many, but believe us, it is much more complex. An image needs to be optimized before you upload it to improve your search engine rankings. If you are just starting out, it can be a little challenging, but don’t worry we will try to break down all the steps necessary so that your images are perfect for SEO.

Photos are important for a website and directly affect conversion rates. Recent research has shown that human beings remember 80% of what they see and only 20% of what they read. MIT also found in its studies that a human brain can process an image in as little as 13 milliseconds. So you can see how important imagery has become for your blogs and eCommerce websites.
Images for your Website: What to Choose
It is fair to say that ‘a picture is worth a thousand words’, and it is especially true in the contemporary world of digital madness that human beings are more fascinated by visuals rather than words. Imagine visiting an eCommerce website that contains only a product description and no product image. You would bounce off right away. Images not only make your website or blog attractive but can also ameliorate the user experience by presenting the information in a digestible way. High-quality photos create a tremendous opportunity, highlighting the brand and bringing in new sales.
More than 3.2 billion images are shared daily on social media and websites. With new tools like Visual Listening, brands can now track all images containing their logo and with the advancement of image recognition technology, companies can personalize customer service to improve customer loyalty and retention
According to Google’s vision of the future of search, visual search could prove beneficial for your business. In addition, for visual content, image SEO should be a priority. We can also see the importance placed by Google on images through its new interface that emphasizes photos with alt tags, descriptions, and filters. It illustrates how Google recognizes the content of images without any external assistance.
But Google does not entertain any kind of image and has set some rules that we have to play by. One of the most important things to keep in mind is to optimize the image before uploading it to the website.
You must be wondering how to do that and where to start? Relax, we have got you covered.
What is Image Optimization?
The significance of images on websites has been increasing over time, and pages with modified and optimized images are getting more traffic as opposed to pages with fewer and heavier images. According to HTTP Archive, images make up an average of 21% of total webpage weightage. If the images are not formatted precisely, this can bring down the ranking of your webpage. Image optimization is the first step for starting your SEO campaign as large images can downturn the web page creating a suboptimal user experience. The concept involves producing and delivering high-quality images of an optimal size, format, and resolution to increase user engagement. The process also requires accurate labelling of images so search engine crawlers can read them and recognize the content of the webpage. Since images consume more bytes than text, their dimension, and intricacy can profoundly impact website functioning.
If you are triumphant in reducing the size of the image without compromising its quality, this will improve the page load time, subsequently increasing the traffic on your website. A group study showed that a one-second delay in loading the website costs a 7% drop in conversion and around 40% of people desert a website that takes more than 3 seconds to load.
Benefits of formatting your image for optimization
Optimizing the Image for SEO purposes is one of the simplest and beneficial things a web developer can do, but sadly it is neglected most of the time. As a result, this reduces conversions.
Let’s take a look at the benefits of image optimization.
-
It improves the loading speed of the pages.
There are many factors on which the loading speed of a website depends, like designs, images, layout, and many more. If the page takes a long time to load, the users will become frustrated and immediately move to your competitor’s site. There are several web speed measurement tools available that can help you check the speed of your site, including GTmetrix, PageSpeed Insights by Google, and Pingdom tool.
-
Improves User Experience
Research has shown that people love websites that open within 2 seconds of clicking. By optimizing the images and other things, you can have more chances of satisfying your users.
-
Helps in Increasing SEO Ranking
Search engines like Google love websites that take less time to load, and if your optimization is effective, Google will automatically rank your website higher. Moreover, your images are presumed to be indexed and crawled faster. If you want to know what percentage of the traffic on your website comes from Google image search, you can use various tools like Google Analytics WordPress plugin or segment to check Google image search traffic . In summary, here are the reasons why it’s important to properly take care of your photos.
- Compact image file sizes use less bandwidth and load faster, making networks and browsers love your page.
- Image compression also reduces the load on the server and creates backups swiftly
- Lastly, as we have already discussed, an optimized web page will lead to more traffic on your website, increasing sales and inquiries.
Optimizing Images for Web Performance
The ultimate aim of image optimization for web performance is to find the equilibrium between the smallest file size and acceptable image quality. The easiest way is to compress the file using some plugin before uploading it to the site, but we should always keep in mind the image file format and the type of compression we will be using. With the right combination of these two, you will skillfully bring down the image size by 80%.
Let us dive in and take a deeper look into different aspects of optimizing an image.
Naming The Image
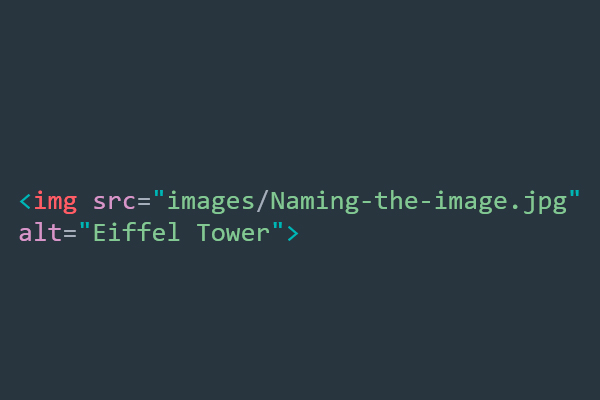
To rank in image search results, you need to choose a creative and keyword-rich name for your photo. To make sure Google knows what is in the image, you need to include relevant keyword phrases in the file name.
For instance, if you are writing something about the Eiffel Tower, and you use an image of the Eiffel Tower at night, make sure the file name does not come as DCJJKLN.jpeg. It would be best to name the file Eiffel-tower-at-night, making sure the main topic of the article and photo starts with the file name.
Always try to put yourself in your customer’s position, and think about how they might browse your website looking for a product or blog.
What naming patterns are they using while searching?
You can check your website’s analytics and know different keyword patterns used by the visitor. Discover the most common keyphrases used and apply that formula to name all the other images to rank better.
Lastly, always try to be descriptive while naming your photo.
Choosing the best Image file format
One of the best ways for web developers to keep the image’s file size in control is to use the appropriate file format. In most cases there are only three formats – JPEG, PNG, and GIFS. All these file formats have their boons and banes; while some take less space, others retain the quality and the data of the images.
JPEGs
A JPEG format is best suited for complex photography or illustrations that have millions of colors and lots of characters like people, places, and things. It produces high-quality photos in smaller file sizes. This format can be used on almost every image except on images with transparent backgrounds.
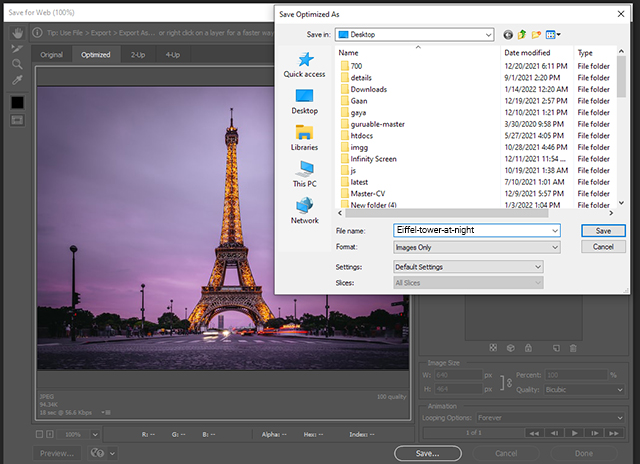
If you decide to go with this format, always choose “Progressive” while exporting it onto the website. This will allow the browser to load a simple version before loading the high-resolution image one.
You’ll find this setting in Photoshop when you export as “Save for Web.”
PNGs
When you want to highlight a subject (like icons, logos, or product images), or want your image to be transparent, PNG will be the best option. PNG produces higher-quality but has a larger file size. Check that your image has the correct dimensions, and look for the option to save as PNG-24 (or 8, if the quality is not compromised).
GIFs
GIFs are the third widely used format that is most sought after on social media for sharing static or animated memes. Unlike JPEG or PNG that support millions of colors, GIFs have a limitation of a maximum of 256 colors.
If you want fast loading speed for your webpage, GIFs are the best choice as they are smaller than both JPEG and PNG file formats.
WebP
The WebP file format was developed by Google and is comparable to JPEG and PNG formats. It also has an advantage over them as it utilizes 25%-34% less space than the other formats. Most of the major browsers are supporting this file format, making it the better choice if you want to revamp your site performance.
SVG
This format is perfect for logos and icons (also flat illustrations). You can resize the image without any worries of distortion, with a little help from CSS and Javascript.
Image file formats like JPEG XR are also in the race but are not supported globally by all the browsers. You can check if your preferred format is supported by different browsers using Caniuse.com.
Using Responsive Images
This part is essential for SEO purposes too. If you use WordPress, it’s done by default, but in case it is not there, always remember to check that the images have srcset attribute or not. These attributes make it possible to serve a different image per screen width (useful for mobile devices).
Resizing Images before Uploading
Another pertinent way to optimize your image is by resizing them before uploading it on WordPress. It is not viable to directly use raw images from your DSLRs as those images have larger dimensions and can slow down your webpage. Although WordPress helps you by providing images in multiple sizes, unfortunately, it does not optimize the image. For instance, when you upload images with a resolution of 1024 x 1024 instead of 500 x 500, all those extra pixels will increase the file size and decrease site speed.
You can decrease the file size simply by cropping the image using image editing software like Slazzer, Adobe Photoshop, Paint, or Preview (Mac).

Compressing Images
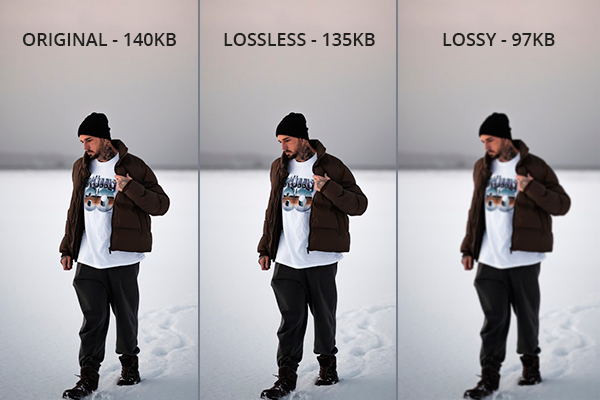
Compressing Images is the final step in preparing your image. There are two types of compression – lossy and lossless. They both reduce the file size without distorting the quality.
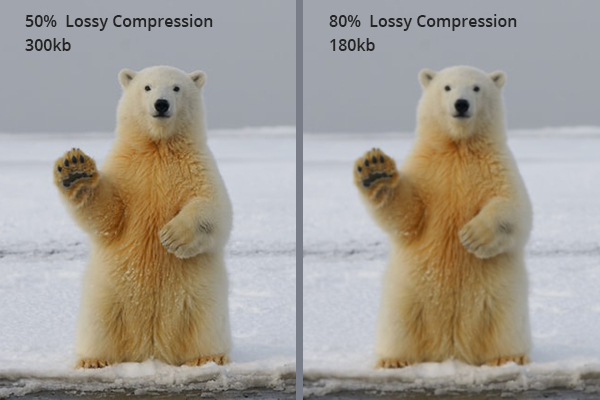
Lossy Compression
This compression will eliminate some of the data from the image in a way that will be unnoticeable by the human eye. Although it reduces the file size, it decreases the quality. Photoshop and Affinity Photos allow you to adjust the quality settings and compress the images. While JPEG and GIFs are lossy formats, there is a noticeable difference in GIFS.
Lossless Compression
Contrary to lossy compression, lossless compression does not compromise the quality of the files. It reduces the data in the image by eliminating all the unnecessary metadata in JPEGs and PNGs.
You can perform lossless compression on your desktop with plugins like tinyPNG, FileOptimizer, ImageOptim, JPEGmini, RIOT, and many more.
Once you have prepared the image, the next step would be uploading them on your webpage. The context of your image needs to be specific for Google to recognize and index it. Make sure only relevant images are attached. As a result, Google and users will find the text and image to be complementary, resulting in a better user experience.
Here are some next steps you will need to take to guarantee that your images are perfectly optimized for SEO.
Choose right captions
In 2012, KissMetrics stated that: “Captions under images are read on average 300% more than the body copy itself, so not using them, or not using them correctly, means missing out on an opportunity to engage a huge number of potential readers.”
The image caption is the text that accompanies the image in that small gray box, which you might have noticed when you had dragged the cursor on the image. It is a cardinal part of SEO as people use them while scanning an article. People like to inspect headings, images, and captions while they sweep through a web page.
A caption does not necessarily have to accompany every image, since they sometimes have different purposes. Keep in mind that over-optimization may result in your website ranking lower.
Optimizing alt text
Human beings can smoothly identify the content of an image, but it is not easy for web spiders to do the same. Without alternative texts, search engines can’t index the image content correctly. It adds SEO value to the website. The alternative text will increase your image’s chances of showing up in Google image and web search results.
It is imperative to add alt-text to every image during the optimization process. Always use focus keywords in alt text so that your image can make sense to both humans and search engines. Sometimes the browser shows the text as a ‘tooltip’, and chrome shows it ‘as was intended’. It happens when people copy alt text from the title, or sometimes they leave it altogether.
You always need to adhere to these simple rules while putting alt text.
- Just like image file names, keep alt text plain and straightforward.
- If you are selling a product, use the model number or serial number in the alt attribute.
- Avoid overusing keywords in the alt text.
- It is advisable not to use alt text for decorative images as most search engines penalize you if you over-optimize.
Using Image Sitemaps
The use of image sitemaps can help your website be found by Google, especially if you have Javascript galleries, image pop-ups, or any other features to enhance the shopping experience.
Images that are not explicitly called out in the source code of the webpage cannot be crawled by web crawlers. Therefore, you must include the location of unidentified images in a sitemap to inform crawlers about them. While sitemaps are not 100% effective in ensuring Google will index your images, it is a step in the right direction.
Just add specific tags for all your photos or create separate sitemaps to list images exclusively or use this guideline by Google when creating a sitemap with image information.
Serving Image via an Image CDN
Content Delivery Networks (CDN) is the most accepted site speed optimization. It hosts images and other media files and also helps solve bandwidth issues. It can speed up the delivery of images by five times.
When you place your image on CDN, you are removing the image from your domain and placing it on the domain of CDN. So if someone links to your image, they will link directly to CDN.
Testing the Images on your Website
We have reached the final stage of our optimization process. While we have discussed scaling images, naming them, choosing the proper format, and all the other steps involved, we must test the images to know which image and title are successful.
- You should always test your site’s images and listings per page. On some non-hosted eCommerce sites, it has been noticed that fewer images increase sales. In other cases, it demonstrated that using more images on a page could improve the user experience while creating more conversions. Check it out and see what works for you!
- Try testing different layouts and find out which your visitors like the most. Conduct surveys to determine what your customers like and discover what they think.
Conclusion
You cannot get results by doing one step and neglecting all the others. If you want your website to become noticeable and likeable among your visitors, you will need to give equal importance to each step and apply it to optimize your image. It will not only improve your SEO ranking but make Google love your website. Just keep these few points in mind, while adding any photo onto your site.
- Always pick the right and descriptive name for your file.
- Always use images that match the text.
- Reducing the size of the image will help in loading your content faster.
- Use alt text on your images.
- Make sure that the dimension of the images matches the standard sides.
Do not underestimate the importance of Image SEO, and choose the correct methods for Image improvements. Optimized Images will increase conversion rates and take your website to a whole new level.


Comments (0)