- Tips & Tricks
- Dec 10, 2021
How to make your Photo Perfect with Color Correction?
Not liking the way your photos are turning out? Here’s a guide to help make your images look more realistic using different color correction tools.

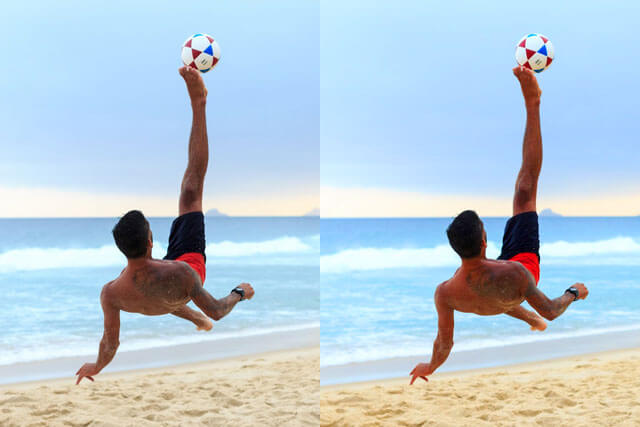
When it comes to photography, there’s nothing more frustrating than taking what you thought would be an excellent photo of a sunrise but the image turns out looking dull and undersaturated. That’s where Color correction and Color Grading come into play to make photos look their best.
What is Color Correction?
According to Studiobinder.com, “Color can affect us emotionally, psychologically and even physically, often without us becoming aware.” Color is subjective just like art. When we see something beautiful, our first instinct is always to grab our camera to capture the majestic beauty in our lense to add to our collection in the future so we can reflect on it and experience the feeling again. We are sometimes left with a dilemma as to the beauty that our eyes perceive, but the camera cannot capture it because both natural and artificial lighting makes the hues in the image look washed out.
This is exactly where color correction comes in to help you edit an image to make the colors look more accurate and natural. If the picture has a white color background, there won’t be much trouble, but for a picture with lots of colors, a photographer has to go through a lot of editing processes to get the perfect result. Once you have corrected the colors in your image and are satisfied with the result, you can then start with the color grading process.
Color Correction v/s Color Grading – How are they different?
Color Correction is done to make the image look exactly what it looks to the naked eyes. A photographer can edit a photograph to neutralize it, making the image look natural and realistic. A few minor adjustments to the colors in the picture to make them look even and as accurate as possible, color correction is the first step in a color workflow It’s the first thing to do before moving on to color grading.
Color Grading is the step we take after Color Correction, in which we enhance our image by manipulating colors to create a new mood or a cinematic tone so that the image looks more artistic. Color grading adds more detailed color tones and preferences to the image so that the audience can better understand and interpret the image.
Color Correcting with the Right Tools
Countless tools are used for Color Correction and it can be confusing especially if you are a novice. So we won’t get into that now and will just be focusing on the three main elements of colors – Saturation, Temperature, and Hue. These three elements work together in harmony to attain the right tonal balance in an image.
Adding depth in the Image with Saturation
There are times when you are not satisfied with a photo you just want to change the image background because it looks very grey or way more colorful. Now of course it’s not an option to erase background or replace it, so what are we going to do in this situation?
The Saturation tool is what we want in such situations. The Saturation tool changes the intensity of all colors or focuses on any one particular color in the image. By increasing the saturation, a dull image becomes colorful and vibrant and similarly, by decreasing the saturation level the image will become more subdued and muted.
Changing Mood of the Image with Color Temperature
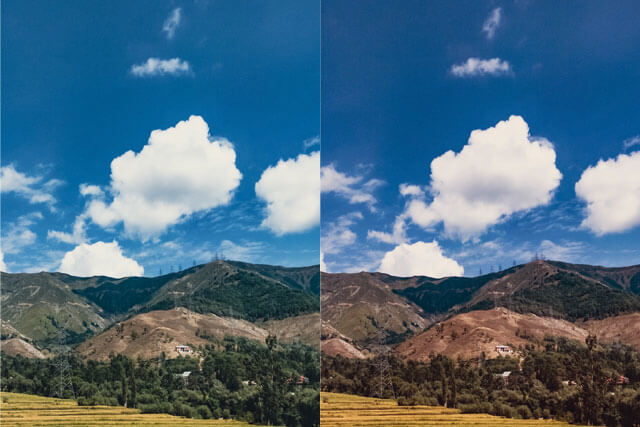
Color Temperature is the color of light that either makes your image “colder” or “warmer”. Cameras are not trained as eyes are, so they cannot adapt to changed light sources as our eyes do. To ensure that the object that appears white to the human eye appears the same in the photos, we use the Temperature tool.
The images can be easily transformed from dull to more buttery and warm or cool and unmuted using the Temperature tool.
Remember when adjusting temperature, making a photo colder will add more blue and white tones while making a photo warmer will add more yellow or red tones. So make sure to use the tool carefully to maintain the balance temperature-wise.
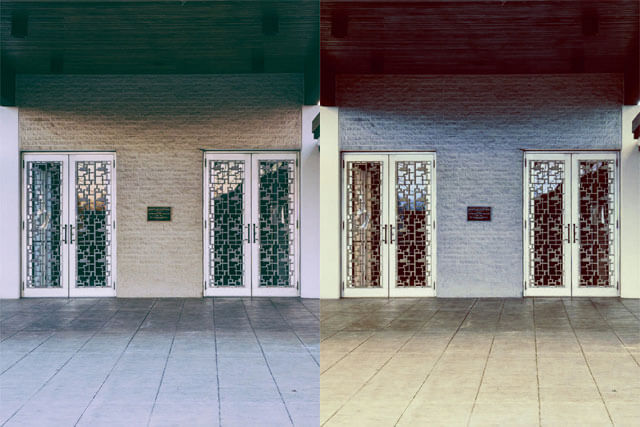
Hue – The Spectrum Of Colors
Hue is the most sensitive tool of all, and adjusting it too much will unbalance the image’s tone, making the technicolor unrealistic. Hues are made up of three primary colors (red, blue, and yellow) and the three secondary colors (orange, green, and violet) that appear in the color wheel or color circle and you can use it to alter the colors in your image.
It’s best to use hue in small increments or point mode so that you can selectively edit the colors in the image rather than a whole.
Best way to become a Champion at Color Correcting in Photography
Now that we are familiar with these Color-Correcting tools, it’s our turn to make the best use of them. But how and where to start? Firstly, select a photo editing software that will be easy to understand and use. Do the editing during the daytime so there is no shadow, reflection, or artificial light that can compromise the natural balance of the image.
When we talk about different software, a person easily gets lost in the sea of so many amazing photo editing software around him. For instance, Lightroom is the most widely used software as it’s easy to use and can get your work done in a matter of a few minutes. Moreover, one can just save a set of editing adjustments, also known as Presets, so that it can easily be applied in multiple photos and save time.
This can be found in Lightroom > Presets on the left bar.
Or if you prefer Photoshop, just go to Image > Corrections and edit your photo according to your liking.
Practicing these tools daily will make any amateur a master photo editor. To get the best results, focus on individual objects while practicing to achieve the best tonal balance. Now let’s say that you want to perform color correction on a particular person in an image, simply remove background from the image or make background transparent with our easy to use Slazzer background remover app or head over to our website and drop the image there and Slazzer will remove background for free. After that, the object can be placed on a white background and edited freely.
Using Lightroom for Color Correction: A Step By Step Guide
For many years Photoshop was the dominating editing software on the market but it had too many features making it complicated for the photographer who only wanted to make slight adjustments. That’s when Lightroom was made so that people who don’t want to edit their photos extensively could use it in place of Photoshop. Its user-friendly interface is easy to navigate and one can locate Color Correction tools like Saturation, Temperature, and hue, all in the same sidebar. Just follow these simple steps and edit the photos like a pro.
- Open Lightroom > Open Library > Import. Under Source, you can easily select an image from your files and then click the import button on the bottom right. Select the image you want and click Library on the top bar.
- You will find the Color Correcting tools under the Basic Panel.
- Under the Custom Section, you will find Temperature which is by default set on 0. To make your image colder, set the Temperature at -100. This will give your image blue tones. Similarly for making your image warmer, set the Temperature to +100. This will give a yellow tone to the image. Under Presence, one can easily adjust the overall saturation of all the colors in the same way.
- There on the bottom is the third box labeled HSL/ Color/ B&W. You can go there and change the hue and saturation of red, orange, green, aqua, blue, purple, and magenta of any individual object.
- Save your image by selecting it on the bottom bar, then click File > Export > Save in your desired setting/format > Export
While you are editing your photo, you can play with all the other tools provided there. You can use exposure, vibrance, shadow, clarity, and many other options. Or you can make a preset of all the adjustments you like and use it in the future on your images.
Using Photoshop for Colour Correction: A Step By Step Guide
Photoshop Software is one of the best and the oldest software used for manipulating and editing images. The only downside is that it’s not as easy to use as Lightroom. Its tools are very sophisticated and for an amateur using them can prove very hefty.
Though the tools are advanced, still the Color Correction palette can be accessed by beginners. Not only that, if someone wants to practice color correction on a particular element in the picture, they can easily remove background from image using the Slazzer extension or the manual selection tool in Photoshop for quick adjustments and more extensive editing.
Option 1 – For Quick Adjustments
- Open image in Photoshop > Filter > Camera-Raw Filter. The image will appear and you can edit it using the toolbars that appear on the right side.
- You will easily find the sliding Temperature bar which will make your image colder or warmer depending on the mood of your image and further down you will also find a Saturation bar from where you can change the intensity of all the colors making your image more vibrant or subdued.
- You will find the slider bars for hue and luminance under the Color Mixer from where you can individually change the red, orange, yellow, green, aqua, blue, purple, and magenta shades.
- If you want to edit the image again you can save the image in Photoshop by going to File > Save or if you want to save the image on your device, click File> Export. You can choose from any extension present there. If you want the image in JPEG format, JPEG > Export.
Option 2 – For Extensive Editing
- Open image in Photoshop > Filter > Camera-Raw Filter. The image will appear and you can edit it using the toolbars that appear on the right side.
- On the top bar Click Image > Correction > Hue and Saturation. You will find a sliding bar for the same which you can use to adjust the levels in your image. You can even Color Grade your image using these tools.
- For temperature, go to the Correction > Photo Filter, here you will find a selection from which you can choose colder blue to green tones and warm yellow. They are listed as individual filters and tints, making them easy for anyone to use.
- To save the file, click File > Export, save as desired file type like a JPEG, and rename it so as not to overwrite your original RAW file > Export.
Although Photoshop is not as direct as Lightroom, once you master its tools, it won’t seem so complicated. There are hundreds of features in Photoshop to choose from like exposure, brightness, sharpness, shadows, and many more to make your image just perfect.

Comments (0)