- Tips & Tricks
- Jul 14, 2021
Remove the Background of an Image in Photoshop
Photoshop is one of the most popular and loved image editors available. It allows various professionals such as designers, photographers, and artists to create, edit, and manipulate graphics. Created in the year 1988 by Thomas Knoll and John Knoll, Photoshop allows you to turn inspiration into incredible pictures without limits. And with its advancement over the years, Photoshop has become the most downloaded tool for designers and photographers in their daily work. Among its various useful features is image background removal.
How to remove photo background in Photoshop?
With background removal, photo studios can place products in front of more pleasing backdrops, businesses can create leaflets from images of people and products, while hobbyists can craft greeting cards and design memes. Product optimization is a main priority in today’s online world to increase sales. However, to fabricate such exciting visuals, you must isolate the subject to put it in front of a new background. But before getting started, focus on the following things –
- Does the subject stand out from the image background?
- Are the edges of the subject complicated?
It would be best to use Photoshop’s Background Eraser Tool or the Slazzer Photoshop plugin in such cases. The latter can be used to create innovative designs by deleting and restoring any part of the picture in seconds. The options do not end there! Keep reading to find out the best ways to erase an image background while keeping the subject intact.
How to remove the background of a picture in Photoshop?
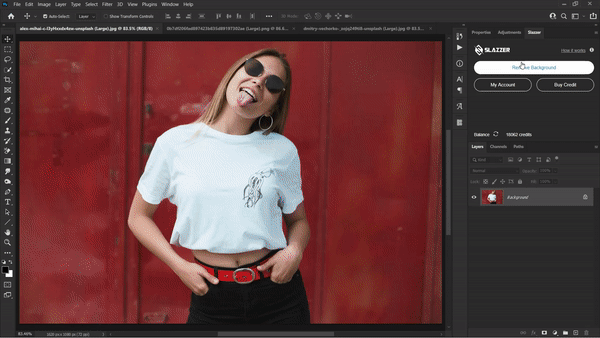
Slazzer Photoshop plugin allows background removal in a click. It enables users to work in their comfort zone at a speed rate never experienced before. Slazzer boasts of accuracy and the ability to cut out all the organic and fine image elements with ease. Plus, you can create innovative designs by modifying any part of the image. Currently, Slazzer supports Adobe Photoshop CC 2018 and above for Mac and Windows. To get started, you need to click the Free button in Adobe Exchange to install the Slazzer plugin. Make sure that you have the Cloud Desktop App (version 4.6 or above). The installation process will take a few seconds, and you should receive a message once it’s finished.
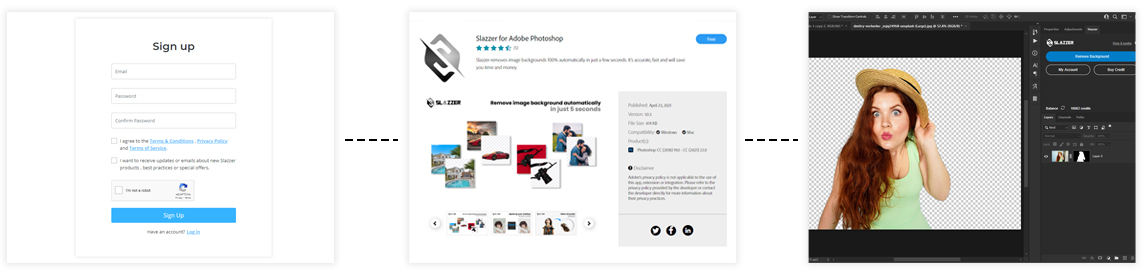
Users can also install the Slazzer plugin manually in case Adobe Exchange does not work. Moreover, the Slazzer plugin can be installed free of cost. You will need credits to process images, which can also be used for other Slazzer integrations. To know more about Slazzer pricing, click here!
Photoshop Remove Background Tool
Besides Slazzer, you can also try Photoshop’s in-built background removal tool. It is the ideal option for users who are not too fussy about the clean edges of an image. To use the Photoshop background eraser tool, you must follow the below steps –
- Open the image
- Create a new layer in the right-hand layer panel
- Select the background layer and deselect others
- Ensure the panel is expanded to see the Quick Actions drop down menu
- Click the Remove Background in the Quick Actions
Quick Selection Tool
It’s hard to imagine the subject of a photo surrounded by a completely different background. Before you place the subject into a new and attractive background, you must remove the existing background of the image. Background removal may seem like a difficult task, but it isn’t with the Quick Selection Tool. This tool is most suitable when there is a clear difference between the foreground and background. The Quick Selection Tool is hand down, one of the best ways to remove image background. Besides, it is super easy to use.
- Firstly, open the image in Photoshop
- To remove the image background, select the ‘Quick Selection Tool’ from the tools panel. In case you can’t find it, look for it nested in the Magic Wand Tool
- In the options bar, check Auto-Enhance, which should give smooth, high-quality edges to the image
- Now, click the button and move the pointer to the desired area. Quick Selection will find tones that match the Selection until it finds an edge
- You can also subtract from the Selection using the Option key or Alt key and move over to the section you wish to deselect
- To deselect an area, you can also change the tool to deselect (minus) in the menu bar

Background Eraser Tool
Photoshop is a savior when it comes to removing image background. The Background Eraser Tool is like a combination of the Eraser Tool and the Quick Selection Tool. This tool works by sampling the color at the center of the brush while deleting the pixels of similar color as you move the mouse. To use this tool, follow the below-mentioned steps.
- Start with opening the image
- Find the Background Eraser Tool in the Toolbox. It may be hidden in the Eraser submenu
- Ensure that the brush is the correct size. While a larger brush is quick, tight spaces may require precision; hence the smaller brush size
- To find edges, set limits on the Menu
- Now, place the center of the brush over the color you wish to remove. You will get rid of matching hues within the tolerance
- By default, the Background Eraser is set to Continuous sampling. This implies that it will erase any matching color that crosshair hit upon. In case you have numerous hues in the background, you must keep sampling and deleting them. However, if you have a single hue such as sky blue, change to Once.
Bottom Line
The process of removing background from images can be complex and tricky. Our guide provides you with all the necessary information regarding background removal in Photoshop. You can use –
- Slazzer Photoshop Plugin
- Remove Background Tool
- Quick Selection Tool
- Background Eraser Tool
In case you are looking for the simplest way to remove background, we advise using Slazzer to remove thousands of image backgrounds in a flash, while turning your ideas into reality. Give it a try and see for yourself!


Comments (0)